Showing posts with label CSA Recipes 2011. Show all posts

Monday, November 14, 2011

Succulent Beef Stew - The Mealtime Cure When Life Is Chaos


Succulent homemade stew tucked in the freezer in individual portions can save the day when life becomes too hectic.

Have you ever had that experience where you feel like you are living in a blender? Your time is not your own. You are juggling many responsibilities, not to mention the odd unplanned crisis or two. On top of that, you may be trying to make 3 healthy meals a day for yourself and your family.

Our lives have had an unpredictable rhythm to them this year. Nothing gets me feeling more defeated than eating fast food, takeout, or dinner from a can out of some sense of coping. I just can't do it. Give me toast, a glass of water and send me to bed hungry.

As I like to tell my family, based on our packed freezer, we are now ready for Armageddon. Well, except if the power goes out.

When I catch a moment and find a great deal on groceries, I have been jumping at the chance to put some great treats into the freezer that will reheat well and reheat quickly. I package in single servings, ready for any size group, which of late is often just one.

Recently, while reading Ron Eade's Thursday grocery special column, I saw that the Metro was advertising roast beef on sale. Two for one. I picked up two pieces just cents apart in price, yielding me a little over 4 pounds of outside round for what worked out to be about $3.65/lb.

I still had colourful carrots of white and purple left from my CSA share from Roots and Shoots Farm. Plus their onions and garlic. I had also picked up a small rutabaga at the Ottawa Farmers' Market from the stand of Needham's Garden Market of Arnprior. My beef stock was made by the Glebe Meat Market. I often keep supply on hand in the freezer.

With these basic ingredients on hand, it was succulent stew that was going to add to our freezer bounty. (Cross rib or blade are more typical cuts for stewing beef but I decided to use my outside round and handle it tenderly.)

Stew is also great for gifting to others with busy, chaotic lives. I have already snuck some into one of the hospital campuses this past week for a loved one's dinner. Dare I confess? I also know of a diligent student now residing at one of our local universities that appreciates an impromptu food rescue when it comes her way.


I asked her for a picture of the gifted stew and mashed potatoes. Also riveting comments.

Her 'riveting' comments: "The food is delicious as always. Thanks so much!" She knows I fuss over plating and when the picture came: "Yummy! But not very artsy."

For what it's worth, plating can really make a meal. I shared with her the picture from my plate. We agreed the differences in look must be about 'lighting'. Yeah, that's it, the 'lighting'.


[photo credit: Starving Student]

By the way, stew tastes even better the next day!


Succulent Beef Stew

4 pound roast suitable for stewing
4 cups carrots, chopped into 1" pieces
2 stalks celery, chopped into 1" pieces

1 small rutabaga, chopped into 1" cubes

2 tablespoons vegetable oil
3 onions, diced

2 large cloves garlic, minced

fresh thyme or 1/2 teaspoon dried thyme

fresh marjoram or 1/2 teaspoon dried marjoram

1 cup red wine
28 ounces diced tomato

4 tablespoons butter
6 tablespoons all-purpose flour
4 cups beef stock
1 cup frozen peas (optional)
1/2 cup corn (optional)
salt and pepper to taste


Cut roast into bite-size pieces about 1 1/2" cubes.

Peel and chop carrots. Chop celery and set the two aside.

Peel the rutabaga and cut into chunks. Set aside.


Dice the onions and mince the garlic.

In large Dutch oven, heat oil over high heat. Sear the meat on all sides in batches (season with salt and pepper just before going into the pan). Then transfer to plate.
Make sure you don't sear it too long or you can actually dry it out.

Reduce heat to medium and cook onions and garlic for 1 minute.

Add carrots and celery. Cook until onions are tender and vegetables perhaps are just starting to brown.


Stir in thyme and marjoram and cook a minute more.
Add wine to help deglaze pan. Add the can of diced tomatoes.

Move mixture to large stock pot. Add meat and rutabaga.


Meanwhile in dutch oven make a roux. Melt butter. Add flour and cook for about 1 minute. Add the beef broth slowly to make a gravy. Add to the stock pot. Add the remaining beef stock not used in the gravy. All vegetables and meat should just be covered in liquid. If not, add more beef stock and/or wine.


Simmer on very low for 3 hours. Just before serving, if using, add the peas and corn and warm through. Also add salt and pepper to taste.
If I am freezing the stew for later, I don't put the peas in until just before serving. I find they don't freeze and reheat well. (They turn a sad, hospital food green.)

Serve stew over mashed potatoes or egg noodles.
Garnish with chopped fresh parsley if you would like to add a bit of colour.

Thursday, October 27, 2011

BEST EVER SOUP: Carrot & Coriander Soup In Brilliant Shades of Autumn


Today I think I made my BEST soup ever. The surprise to me is that this is a soup (or at least a variation of it) that I make with some frequency. Why was it so much better this time?

I used local produce (carrots, potato and garlic) from Roots and Shoots Farm, my CSA partner.

I used mainly orange carrots. But to round out the two pounds I included two white carrots and two purple carrots.


The colour from the purple carrots bled out into the liquid while the soup was cooking.


However, when the soup was puréed, it gave the soup a beautiful muddy, earthy, deep burnt russet orange colour. Not the hue of pink I was fearing.


Since I did not have my own chicken stock, I used stock from The Glebe Meat Market on Bank Street. They sell it in 500 mL bags.

I used the Vitamix on the double high speed for an extended period of time to make the soup silky soft.

What did I like about this soup? I loved how the coriander stood out boldly against the sweetness of the carrots. I loved the undertone of heat from the cayenne. I was a little more heavy handed than usual. I was particularly pleased with my choice of garnish.

Most of all, I loved the colour.

CARROT AND CORIANDER SOUP

2 pounds carrots
1 potato
3 ounces butter
1 medium cooking onion, peeled and diced
1 garlic clove, minced
1/4 cup fresh cilantro
1 litre chicken stock
1/2 teaspoon sugar
1/2 teaspoon salt
1 large bay leaf
1/4 teaspoon celery salt
1/4 teaspoon cayenne
plain yogurt
fresh cilantro
bacon

Peel the carrots and cut crosswise into 1/2 inch pieces. Peel the potato and cut into small cubes.

In a large saucepan over medium-low heat, melt the butter. When hot, add the onion and sauté while stirring occasionally, until translucent, 3 minutes. Add the garlic and sauté while stirring until beginning to change color, 20-30 seconds.

Add the carrots, potato, and fresh coriander. Sauté, stirring a couple of times, for about 2-3 minutes. Add the chicken stock, sugar, salt, bay leaf, celery salt, and cayenne pepper. Over medium heat bring to a simmer. Lower the heat, cover partially and continue simmering until vegetables are soft when pierced with the point of a knife, about 20-25 minutes.

Remove the bay leaf. Use a Vitamix or blender to purée the soup in small batches. The soup may be made ahead to this point; covered and refrigerated. (We use our Vitamix and it always gives a great consistency for soup.)

Return the soup to the saucepan let it simmer on a very, very low simmer to keep warm. Taste for seasoning and adjust as necessary. If the soup is too thick, add more stock or water.


Garnish with a dollop of yogurt, chopped coriander leaves and crumbled bacon.

Saturday, October 15, 2011

Petit Hakurei Turnip Latkes - Darling Hors D'Oeuvres


I feel there is a movement trending to use the technique of grating or shredding in food preparation. Most recently I experienced at least a half dozen presentations of 'slaws' at the Savour Stratford's tasting event.

When I considered how to use my Hakurei turnips from my latest CSA basket from Roots and Shoots Farm, I saw slaw.


But the raw turnip does have a strong taste. My idea to temper that flavour was to make them into mini latkes. I was feeling quite genius until I hit Google and saw that this has been done MANY times before.

A number of the recipes were the same. Just a basic latke recipe. Since I had never made latkes, let alone Hakurei turnip latkes, I kept things simple.

The result was 'Green Acres meet Park Avenue'. They made for beautiful hors d'oeuvres. The mister thought they would have been divine served with bubbles. On this, I would have to agree.

Petit Hakurei Turnip Latkes

Latkes:
Hakurei turnips (I used my entire bunch)
1/2 onion chopped
1 egg
1/4 cup all-purpose flour
salt
pepper

Garnish:
Sour cream
maple syrup
plum jam
sriracha
chives

Clean the turnips. Cut off the greens and end. Peel. Using a box grater, grate the turnips. Press all the moisture out of the shredded turnip. I used a big paper towel and twisted it at both ends in opposite directions. You may need to use a second paper towel.

Whisk an egg into a medium bowl. Add the wrung out turnip, salt and pepper. Mix. Sprinkle the flour over the turnip and mix. Let the batter sit for 15 minutes.


Heat oil in pan. (Do not use olive oil as it is not a good oil for frying. I used canola oil.) Drop a piece of turnip in the pan. When it sizzles, it is time to make the latkes. Drop a teaspoon of the latke mixture into the oil and flatten with the back of the spoon. If your oil is hot enough, the latkes should not stick to the pan or absorb the oil. Make sure the oil is not so hot that it is smoking. If they brown too quickly, they may not cook properly in the centre.

Once they have turned a golden brown, flip them and finish frying on the other side. You are frying them for approximately 2 minutes a side.


Place the cooked latkes on a paper towel to blot any excess oil.


Serve toasty warm with the garnish of your choice. Sour cream or a dip with a sour cream base is quite common.

You can keep them in a warm oven until they are ready to be used. They would hold up well made ahead and reheated.

Tuesday, October 11, 2011

Get Well Soup


Today I found out a special someone was feeling 'not so great' over the Thanksgiving weekend. I felt compelled to heal with food. I knew I couldn't pull chicken noodle soup out of a hat on short notice, but I could do something similar.

Get Well Soup

6 cups homemade turkey stock
2 cups homemade tomato juice
1/2 field tomato, cubed
1 large carrot, diced
1/4 cup diced celery
1 onion, diced
herbs
salt
Capellini noodles, broken into matchstick lengths

Combine all the ingredients into a saucepan and simmer until the vegetables are soft and the noodles are cooked.

* I was happy to be able to use carrots, celery and onions from Roots and Shoots Farm.

Then, piping hot, into a mason jar and 'Special Delivery'!


Not feeling that great myself today, there was enough left over that I too could enjoy Get Well Soup for dinner.

HOW TO: Rødkål - Danish Braised Red Cabbage


Rødkål (braised red cabbage) is a very popular dish in Denmark. It is commonly served with roast pork, sausages, duck, goose, frikadeller or turkey. I find the dish tastes much better when it is reheated the second day.

Whenever I received a red cabbage in my CSA basket this summer from Roots and Shoots Farm, I almost always made rødkål and froze it for future use.

This time when I made rødkål I had two cabbages. One regular size and a wee one. So I made one and half times the recipe below.


I think that rødkål is considered most authentic when it is made with red currant jelly. But plum jam works well too. We had homemade of both growing up but more often than not it was the plum jam that was plentiful.

Rødkål - Danish Braised Red Cabbage

1 Red Cabbage, shredded
Salt
2 tbsp Butter
2 tbsp Vinegar
1 Apples, diced or shredded
1/4 cups Plum Jam, or red currant jelly

Shred cabbage. I use my KitchenAid food processor and use the straight blade of the double blade. This gives a thin cut.


Melt butter with vinegar in dutch oven. Add shredded cabbage. Lightly sprinkle salt on each layer as it is added to the pot.

Skin the apple, core and quarter. I use my large shredding blade for processing the apple. Or sometimes I just dice it. Because I tend to use the McIntosh apple, it breaks down well in the braising process no matter what its starting shape.


Add plum jam and diced/shredded apple to the dutch oven. Mix with the cabbage.


Keep the lid on. Make sure that the cabbage does not cook dry! Add a bit of water if you are worried about that. Cook at least for 1 hour on a very low simmer.


The braised cabbage freezes well. It was a way of softening up the cabbage too, which is why I love having it as a reheated dish. It just seems so much better. I freeze it in portions so I don't have too much when I go to use it.


To reheat, put the thawed cabbage into a pot on a very low simmer and add a bit of plum jam or red currant jelly. Heat it through. I find the cabbage looks a bit pale when I freeze it, but when I reheat it with a bit of jam, the dark colour comes back.

We ALWAYS have rødkål with turkey at Thanksgiving and Christmas.

Monday, September 12, 2011

Red Pepper and Peach Relish - A Staple in Our Home


Of all the jars in our 'fridge pharmacy', the one we value the most is Red Pepper and Peach Relish. Like butter tarts and espresso beans, we seem to be on a perpetuitous search for the best. Even though that best may possibly be our own.

We are coming off of a canning/preserves bender. Jars of minced garlic were first to the freezer, followed by basil pesto. 3/4 of a bushel of tomatoes have been reduced to sauce. Another 3/4 bushel to go. Since there were some wee jars left and produce readily available, we just continued to indulge.

We adapted our recipe from Canadian Living's Red Pepper and Peach Relish. We used two small jalapeños to give it some extra kick. We simmered the batch by an additional 20 minutes. I prefer my relish a bit thicker. It meant 8 cups instead of 9. I may consider even longer next time.

Our Ontario peaches were picked up at Farm Boy. The jalapeños and one of the red peppers came from our CSA basket from Roots and Shoots Farm. The remaining red peppers also came from Farm Boy. This week they were 99 cents a pound.

It is a lot of work doing the chopping but it makes for a beautiful, delicate relish if the peaches and red peppers are chopped very finely. On that point, I wished I had fussed a bit more. It pays to have great knife skills for this task.

We often use the relish as an accompaniment for grilled salmon. It is a good garnish for hors d'oeuvres that use cream cheese, salmon or goat cheese.

Sunday, September 11, 2011

Rockin' the Basil with Pesto Passion


This is either my third or fourth batch of pesto this summer. We have been consuming it in quantity, as well as gifting it. Each batch has been a bit different and this has been my favourite so far.

My basil was sourced from Waratah Downs Organic Farm at the Main Street Farmers' Market. The market operates on Saturday mornings from 9 am to 2 pm on the grounds of Saint Paul University, 223 Main Street, Ottawa. Waratah Downs also goes to the Ottawa Farmers' Market at Lansdowne on Sunday.

I purchased 4 bunches for $2 each. Each bunch had approximately 10 stems. After I picked and sorted the leaves, I had 280 grams of basil for my pesto. (Probably between 9 and 10 cups.) I gave the leaves a wash, spun them dry in the salad spinner and then laid them out on a tea towel to dry. It is important to move quickly, as bruised basil will start to darken.


My garlic was from my Roots and Shoots Farm CSA basket. I almost used one full head for a single batch.


I purchase my extra virgin olive oil (Kirkland brand), pine nuts and Parmigiano-Reggiano from Costco.

The lemon juice is used to keep the green as bright as possible.

I have toasted my nuts and roasted my garlic but this time I took them both straight up.

I considered using my VitaMix to make the pesto but ended up moving to the KitchenAid food processor. It just gives much better control of the pulsing. I like my pesto with a bit of body. Not to super smooth. Do we call that 'rustic'?


Leave a bit of room in the top of each jar to top up with a cover of olive oil. This also helps to keep the colour. Whenever you use any, level out the top and cover again in olive oil. I great tip from my foodie friend, JK.

The flavours in this batch were my favourite so far. Was it because my basil and garlic were organic? Were the leaves just the right degree of tender? Who knows what made this batch so perfect. I am just pleased that I could double the batch and tuck 1 5/8 litres into the freezer for the coming months ahead.

Basil Pesto
Adapted from many.

140 grams of cleaned basil leaves (~4.5 cups)
1 1/2 cup extra virgin olive oil
4 - 5 cloves garlic, minced
1 cup grated Parmigiano-Reggiano
3/4 cup pine nuts, raw
3/4 to 1 teaspoon salt
lemon drops, just a few squirts

Combine prepared ingredients in the food processor. Pulse chop until the desired consistency. Fill jars leaving room for a cover of olive oil. Keep in the freezer.

Gelato ... Watermelon ... Gelato ... Watermelon ...


It is those bright, sunny Sundays that have a gentle pace to its gait, that fuels ones temptation to cool down with a midday treat.

We had spent the early afternoon preserving some recent market purchases. At that natural rest point of task completion, I was fixated on cooling down. To a heaping Stella Luna gelato.

But beckoning me in the chill of the fridge was a sturdy, fresh, young watermelon. An extra special something that came in our Thursday CSA basket from Roots and Shoots Farm.

My mind ping ponged back and forth. Gelato ... Watermelon ... Gelato ... Watermelon ...


I conferred with the mister. He rescued us from my thoughtful volley and began his surgical cuts into our flawless melon.


The flesh was cold and sweet and juicy. And like a 'real' watermelon, there were seeds. Imagine sitting out on the back deck, trying to arc the seeds into the neighbour's backyard. But did we? Or did we just close our eyes and take succulent bites, pondering the last days of summer?

Friday, September 2, 2011

It's Hard to Eat Out With This Kind of Eating In


Lunch today was yet another version of our favourite warm summer pasta dish.

Our wonderful produce from Roots and Shoots Farm makes it easy to pull it all together. This time, we used the following items from our last CSA food basket - garlic, red scallions and red Russian kale.

As well, our Yellow Perfection tomato plant from Vicki's Veggies Farm near Picton is full of bounty and added bursts of bright, sweet, sunny tomato flavour.

It's hard to eat out with this kind of eating in.


Heirloom Tomatoes, Red Russian Kale, Scallion, Garlic, Pesto Penne Pasta
Serves 3

2 tablespoons olive oil
3 red scallions, diced (include healthy parts of the greens)
4 cloves of garlic, minced
1 teaspoon chili flakes
2 red heirloom tomatoes
5 yellow heirloom tomatoes
10 leaves of red Russian kale
salt to season
150 grams penne pasta (my favourite dry pasta brand is Barilla)
1/4 cup pesto
3/4 cup of parmigiano-reggiano, grated
shavings of parmigiano-reggiano
toasted pine nuts

Prepare the ingredients. Dice the scallions. Mince the garlic. I used my preserve from the fridge that is sitting in olive oil. Chop the tomatoes. Remove the stems from the kale. Rough chop the kale leaves. Grate and shave the cheese.

Prepare the penne pasta until el dante. When it is drained, return to the pot and keep the lid on to keep it warm until the sauce is done.

Heat oil in a fry pan. Sauté the scallions until soft. Add the minced garlic and chili flakes. Continue to sauté for another 30 seconds.

Add the tomatoes. When the tomatoes have warmed, add the chopped kale. Sprinkle with salt. Add a bit of water to the pan to help steam the kale if there does not appear to be much liquid from the tomatoes.

When the kale has just wilted and cooked, remove the pan from the heat. Make sure you do not over cook the kale. The kale should be limp but still be a bright green.

Put the pesto on the pasta and stir to cover. Add the vegetable sauce to the pasta and stir. Add 1/2 cup or more of the parmigiano-reggiano to the pot and stir.

Serve in warmed pasta bowls. Sprinkle with parmigiano-reggiano and toasted pine nuts.


Roots and Shoots Farm
1004 Manotick Station Road
Manotick, Ontario
robin@rootsandshootsfarm.com
Website: www.rootsandshootsfarm.com
Facebook: Roots and Shoots Farm
Twitter: RootsShootsFarm

Vicki's Veggies
81 Morrison Pt Rd
Milford, Ontario
613-476-7241
Website: www.VickisVeggies.com
Facebook: Vicki's Veggies Farm
Twitter: VickisVeggies

Tuesday, August 30, 2011

Creamy Veal Scallopini Marsala with Local Veggies


The mister has been a super rock husband lately and so I decided that Monday's dinner would have a bit of fuss and fancy. The veal dish is quite easy as was preparing the sides. But I am not going to tell him that. We rounded out are meal with a glass of Amarone.

There is a sense of contentment that comes from using local produce in the summer. Just knowing it is fresh, fresh, fresh.

I dipped into our Roots and Shoots Farm CSA basket in order to make this meal work.


The purple, yellow and green beans create quite a colour statement. However, when they are steamed, the purple beans turn a dark shade of green.


Our veal marsala recipe uses garlic as well as shallots to create extra flavour in the mushroom sauce.


I had no idea what to do with these sexy zucchinis when they came in the basket. I lightly steamed them, cut them in half and then sautéed them to give them a bit of brown and a nutty butter flavour.


I used the brown skinned potatoes for this dish. Peel, roasted, tossed in olive oil, seasoned with salt, pepper and fresh thyme and then into the oven at 375F for about 45 minutes. When roasting potatoes, I use my 9" x 9" stoneware pan. When there is just two of us, the big roasting pan is too much. The stoneware gives the potatoes a unique crisp.


The small selection of carrots were quartered lengthwise and roasted along with the potatoes.


With just a few tomatoes left, they became the last garnish on the plate.

Where do you get your veal scallopini? My veal scallopini came from the Glebe Meat Market on Bank Street in Ottawa. I usually just go there for their 1/2 litre bags of housemade stock - beef, chicken, vegetable, turkey and veal. I am curious to know where others shop for their veal scallopini. Have you found a favourite?

Creamy Veal Scallopini Marsala
Inspired by Canadian Living, Epicurious and The Food Network

3/4 lb veal scallops, pounded very thin
flour for dusting (salt and pepper incorporated)
1 tbsp oil
2 tbsp butter
2 cups sliced mushrooms
2 tbsp shallots, minced
2 cloves of garlic, minced
1/2 cups veal stock
1/4 cups Marsala
1/2 cups heavy cream
salt and pepper to taste
chopped parsley (optional)

Once the veal scallops are pounded very thin (using flat side of meat cleaver between 2 sheets of waxed paper), dust veal lightly with flour mix.

In large skillet, heat oil with 1 tbsp of the butter over medium-high heat. Cook the veal for about 1 minute on each side or until lightly browned. Remove and set aside. Continue until all the veal is done.

Melt remaining butter in skillet and sauté the mushrooms, for about 3 minutes or just until tender. Let them sit in the pan in order to get colour and caramelized edges. Too much moving will prevent this from happening. Add a little more butter if needed. Remove the mushrooms and place with the veal.

Add the shallots and garlic to the pan. Cook until softened, usually less than a minute. Stir in the veal stock and Marsala. Reduce by half. Add any juice that has accumulated around the veal and the mushrooms. Add the cream.

Reduce again to thicken slightly. Season with salt and pepper to taste. Add the veal and mushrooms back to the pan to reheat through. If using, sprinkle with parsley and stir in.

Makes 4 servings.

Monday, August 29, 2011

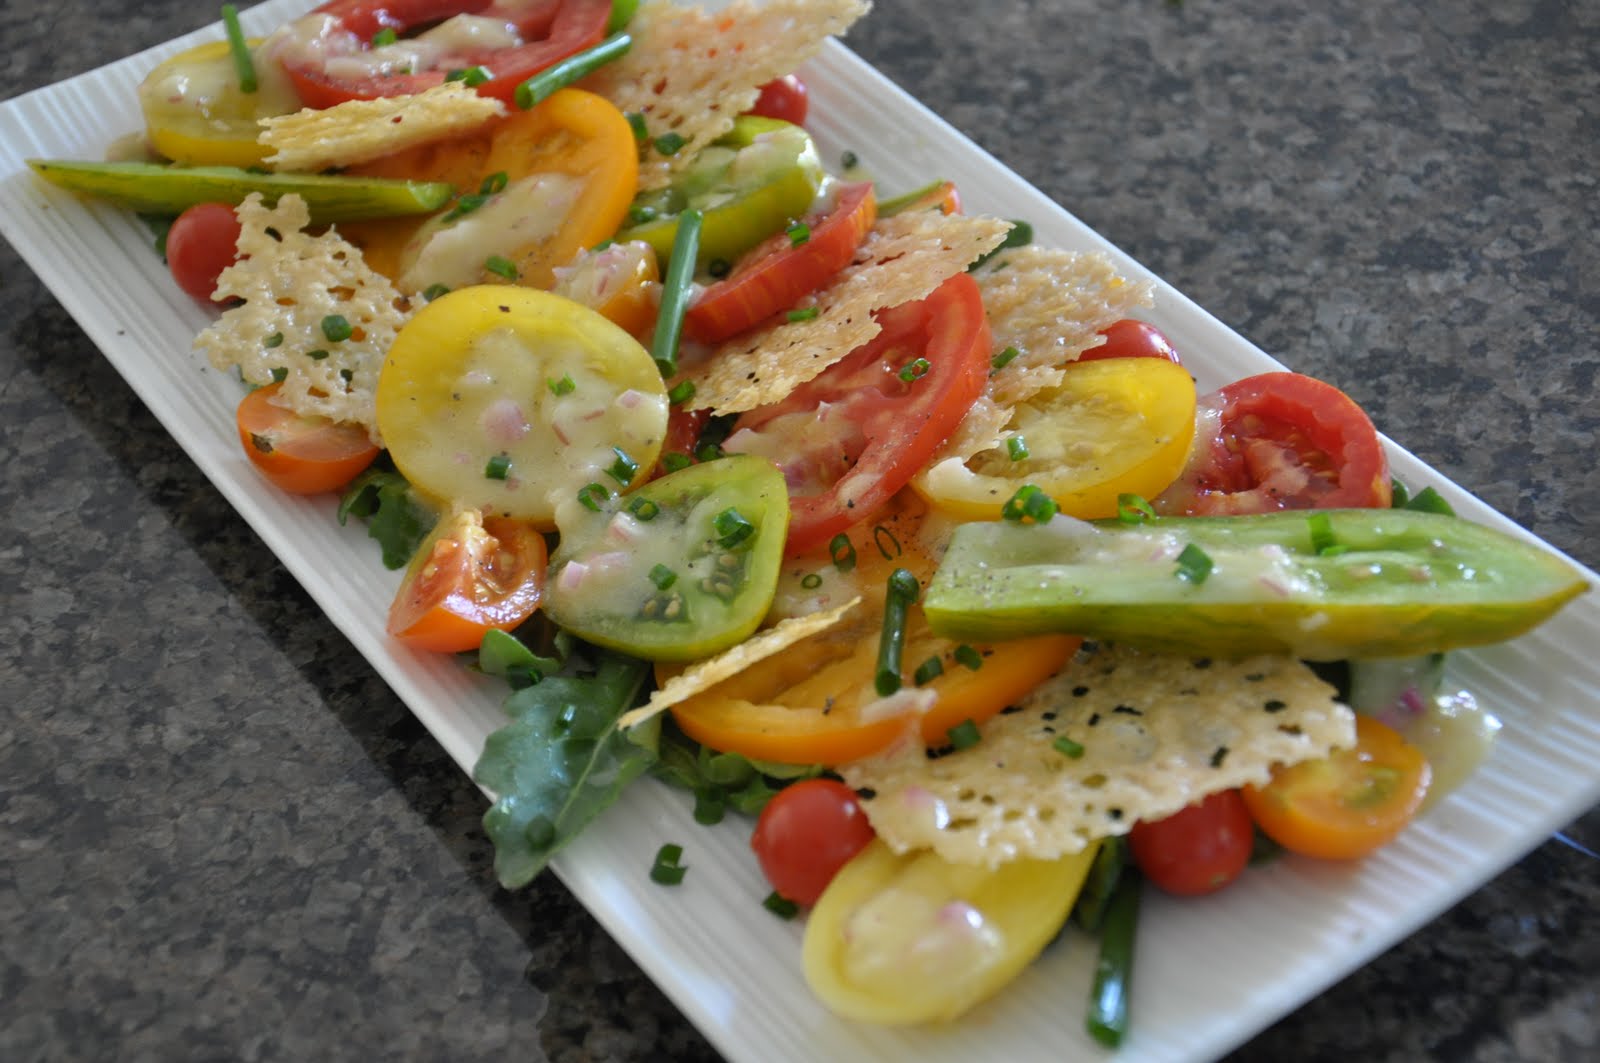
Heirloom Tomato Napoleon with Parmesan Crisps & Herb Salad


A fresh heirloom tomato salad is a rainbow of flavours bursting with sweetness and complicating the gastronomic senses.

The cascade of colours in our salad was a combination of fruit from local growers we hold in high regard:
  • Roots and Shoots Farm (our latest CSA basket)
  • Bryson Farms (sourced at The Piggy Market in Westboro)
  • Vicki's Veggies (we planted one of her Yellow Perfection seedlings in June)
  • Fran, a garden enthusiast and friend from Manotick (our Sweet 100 seedling was gifted to us at Easter and lovingly christened Heinz)
I first made Fine Cooking's Heirloom Tomato Napoleon with Parmesan Crisps & Herb Salad in September 2008 when I read about it in their July 2008 issue.


[The 4 tomatoes on the left are from Bryson Farms. The 10 wee red marbles are my Sweet 100's. The 3 yellow tomatoes in the middle are Vicki's Veggies' Yellow Perfection also grown in our garden. The remaining 7 tomatoes on the right are from Roots and Shoots Farm.]


Heirloom Tomato Napoleon with Parmesan Crisps & Herb Salad
Serves 4

For the Parmesan crisps:
2-1/2 cups grated Parmigiano-Reggiano

For the vinaigrette:
1 small shallot, minced (about 1-1/2 tablespoons)
4 teaspoons Champagne vinegar
1 teaspoons Dijon mustard
Kosher or sea salt and freshly ground black pepper
2 tablespoons. extra-virgin olive oil
2 tablespoons grapeseed oil or canola oil

For the salad:
1 cup baby arugula leaves
1 cup fresh flat-leaf parsley leaves
1 cup fresh basil leaves, torn into bite-size pieces if large
1/2 cup fresh tarragon leaves
1/2 cup 1-inch-long fresh chive pieces
20 small nasturtium leaves (optional)
Kosher or sea salt and freshly ground black pepper
Sixteen 1/3-inch-thick heirloom tomato slices, preferably of different colors, sizes, and shapes (2 to 3 lb.)
About 20 various heirloom cherry tomatoes, halved or quartered


The above is Fine Cooking's ingredient list. I made a few changes to the recipe:
  • Because I used a grater to prepare my cheese, I only baked the Parmigiano-Reggiano for 8 minutes on a parchment lined baking sheet.
  • I used only arugula for the greens and only enough to set a base on the plate.
  • I used chives as a garnish - both as 1-inch straws but also finely chopped.
  • I chose a different plating for the ingredients instead of the Napoleon formation. (see picture)
  • Of their oil suggestions, I used olive oil and grapeseed oil in the dressing.


Roots and Shoots Farm
1004 Manotick Station Road
Manotick, Ontario
robin@rootsandshootsfarm.com
Website: www.rootsandshootsfarm.com
Facebook: Roots and Shoots Farm
Twitter: RootsShootsFarm

Bryson Farms
R.R.1, 25 Stewart Road
Shawville, Quebec
819-647-3456
Website: www.brysonfarms.com

The Piggy Market
400 Winston Avenue (in Westboro)
Ottawa, Ontario
613-371-6124
Website: www.ThePiggyMarket.com
Twitter: ThePiggyMarket

Vicki's Veggies
81 Morrison Pt Rd
Milford, Ontario
613-476-7241
Website: www.VickisVeggies.com
Facebook: Vicki's Veggies Farm
Twitter: VickisVeggies

Thursday, August 25, 2011

Culinary Montage Using Produce from Roots and Shoots Farm


We really enjoyed our last CSA basket from Roots and Shoots Farm. Although we had challenges as far as being home enough to enjoy all the produce, we managed to turn just about all of it into delicious creations. We still have three potatoes left. That's not a bad thing.

Here is a recap of our wonderful dishes from Week 7's CSA Basket. How is it going with your fresh, local produce? Have you made some new creations?

[Recipes can be found in other posts. Just click on the pictures.]


Related Posts Plugin for WordPress, Blogger...